Showing posts with label home makes. Show all posts

Tuesday, 31 October 2017

Handmade Halloween

Two Halloween ghosts made from paper hankies, for Adrienne Wyper's Made it! craft blog
Sick of Halloween decorations and costumes, fake cobwebs and plastic pumpkins festooning every shop you enter? For me, Halloween decorations and costumes should be based on stuff you have around the house, not on a load of mass-produced tat you buy and use/display for one day only. Waste of money, waste of the world's resources.

(The award for the most inappropriate Halloween display goes to my local B&Q, which had a 'trick or treat' bunting banner suspended over…the paint aisle. How about a beautiful display of your black grasses, nearly-black Cosmo atrosanguineus, dark purple-leaved heuchera and orange-flowered plants to salute the season instead?)

So here's a truly last-minute way to decorate your home or garden, made from stuff you're likely to have around the house: tiny dangling ghosts.

You will need
• Paper hankies
• Scrap paper
• Black felt tip
• Needle and black thread

Fold the hankies in four, corner to corner, to find the middle. Draw on two black circles for the eyes, slightly below that point. You can add a mouth if you want.

Crumple up the paper into a ball shape.

Thread the needle, keeping the thread doubled. Tie a knot in the end. Push the needle through the paper ball. Now position the hanky so that the needle comes out through the top of the ghost's head.
Squeeze the hanky around the paper ball to give a more drapy shape.

Tie your ghosts to a twig, window catch, mantelpiece… wherever you want.

More…
Last year I made a mini pumpkin lantern from a Cape gooseberry

Thursday, 14 September 2017

String of ring shells


Coastal style, for free, with a shell mobile – or a seashell wall hanging, if you prefer.

We all like to pick up stones and shells at the beach; some sort of leftover hunter-gatherer instinct, I think. Or all those interesting textures, colours, shapes... Anyway, I was on the beach near Alnwick, in Northumberland the other day (pic at bottom of page, and started picking up ring shells (limpets, in this case, whose tops have worn away). My goal was to find one to wear on my finger, having admired one on a woman in Western Australia once, asking her where she'd got it.

After I'd found one of those, I carried on picking them up, as I walked along the stunning, reflective expanse of sand/sea/sky, turning over the ring shells in my pocket, and decided that, back in the motorhome, I'd string them on a long length of what I had to hand there, which was fishing line.

For maximum beachcombing cred, you could use some discarded fishing line you find. It's dangerous for wildlife, as it's practically invisible, so removing it from the natural environment is nothing but beneficial. And untangling the knots would probably be a great mindfulness exercise. However, I didn't see any discarded line...

Back in the motorhome, I cut a length of line, and tied on my first shell: bigger than the rest, to give the finished piece some weight and encourage it to hang straight. I just tied two granny knots with the end of the line, then carried on with the rest of the shells, tying reach on with two granny knots and roughly equal intervals along the line. At the top I tied a hanging loop, and there it is: a string of ring shells. I think it's offset well by the faux wood of the motorhome wardrobe door.

This project was great for a small space like the motorhome (no need for a pure white, perfectly tidy dedicated craft room, as seen on some Instagram accounts), and it was so satisfying to make the seashell wall hanging not far from where I'd found the materials.

This may be the last motorhome trip of the season, and I'll probably take the string of ring shells home with me, as a memento of the last days of summer.


Thursday, 9 February 2017

Keep the pot hot: free knitting patterns for tea cosies

Whether they keep the teapot hot or not (opinions vary), a hand-knitted tea cosy is perfect for lending an authentically vintage vibe to any tea table. Here are some of the best tea cosy knitting patterns, all from the UK, and all free.

Nixneedles striped vintage tea cosy knitting pattern, on Made it!
Super Chunky Tea Cosy, from Nixneedles
Solidly stripy, in muted shades – and with a pompom!


Zoe Halstead's Home Sweet Home vintage tea cosy knitting pattern, featured on Made it!
Home Sweet Home, by Zoƫ Halstead, from Let's Knit
A Fair Isle design featuring hearts, houses and 'Home sweet home'


Tea by the Sea vintage tea cosy knitting pattern, featured on Made it!
Grannie's Traditional Tea Cosy, from Tea by the Sea
Keren Smith created this pattern based on a vintage tea cosy that her gran knitted, working out how to create the double layer.


Nixneedles large-teapot vintage tea cosy knitting pattern, featured on Made it!
Traditional striped tea cosy, from Nixneedles
This pattern is for an 8-10-cup teapot, worked in chunky wool.


Ruth Cross vintage zig-zag tea cosy knitting pattern, featured on Made it!
Stretchy zigzag tea cosy by Ruth Cross, from Let's Knit magazine
You'll need to register to download this PDF pattern (which doesn't mention the sewn-on sequins this one's been decorated with – obviously you can embellish any tea cosy, or other knitted item, in whatever way you choose).


Here's another Made it! blog post on where to find free knitting patterns

Monday, 23 January 2017

Patchwork – and patience - the quilt is finished!

Finished brick-pattern patchwork quilt, by Adrienne Wyper, on her Made it! blog http://made-it-made-it.blogspot.co.uk
Precision and patience are both necessary for patchworking. Precision for the accurate measuring and cutting required to make your fabric pieces, and patience because it takes forever! That's why patchwork is intrinsically unsuitable for me: I enjoy a creative challenge, but I'm also fond of instant gratification.

At the weekend I finally finished my first – and possibly only – patchwork quilt. It took five hours to sew the patchwork, backing fabric and wadding together, and to make and attach the binding.

The project began about six months ago when I borrowed The Quilting Book (DK, £25) from my local library to see if there was a patchwork pattern simple – and swift – enough for me to follow. The book was due back before I'd started so I took a pic of the brick quilt pattern (which looks like brickwork except all the 'bricks' aren't the same size). It's designed to work with a fabric jelly roll (pre-cut fabric pieces rolled up together) but I didn't have one of those; I had an assortment of fabric leftovers and old clothes.
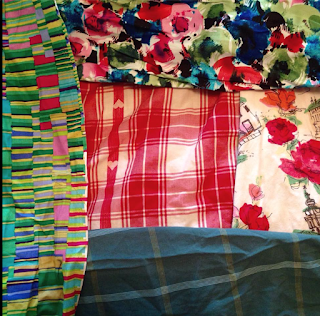
Fabrics for patchwork quilt, by Adrienne Wyper, on her Made it! blog http://made-it-made-it.blogspot.co.ukClockwise, from the top: leftover fabric from sewing a Colette Sorbetto top, an old skirt of mine, an old shirt of OH's, leftover fabric from sewing a Prima pattern top, and, in the middle, an old dressing-gown given to me ages ago by my step-grandma.

The wadding came from Hometown, Rochester, along with advice on why it didn't matter in the slightest if the quilt wasn't perfect, and the backing fabric was from Croft Mill.


Cutting out patchwork pieces, by Adrienne Wyper, on her Made it! blog http://made-it-made-it.blogspot.co.ukSo first I had to unpick all the seams, remove pockets, bias binding, hems, collars, cuffs...
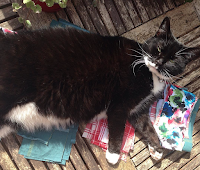
Cat lying on patchwork pieces, by Adrienne Wyper, on her Made it! blog http://made-it-made-it.blogspot.co.ukNext I started cutting the fabric into strips. The sun was out, so I did a bit in the garden, at which point my cat decided to 'help' by lying on the piles of pieces. (She enjoys lying on the finished quilt too.)

When I came to sew the backing fabric, wadding and patchwork layers together, I first laid them out (on the living room floor, again). I pinned them together (taking blogger Flossie Teacakes's advice to pin from the centre, in concentric circles).

I machine-stitched around the edge, then came the quilting. Taking my friend Kirsten's advice, I started at the centre point. She's very meticulous and methodical: perfect atrributes for a patchworker and quilter. (I commissioned her to write this beginner's guide to patchwork and quilting). I stitched 'in the ditch' (along the existing seam lines) lengthays and widthways at the centre, then halfway between the centre lines and the edges to give 16 quilted squares.

Finally, I made some binding for the edges, by cutting six metres of 12cm-wide backing fabric, then ironing in half, then folding each side into the centre. It doesn't need to be bias binding because it's for a straight edge, thankfully. I've made bias binding and it takes even longer!


What went wrong 
Given that it was my first quilt, and that, as stated above, patchwork and quilting are unsuitable crafts for me, I wasn't expecting it to turn out perfectly. And it didn't!
Close-up of brick-pattern patchwork quilt, by Adrienne Wyper, on her Made it! blog http://made-it-made-it.blogspot.co.uk

• One of the hardest things was placing each fabric piece so that it didn't touch another of the same pattern. I planned the layout by laying the fabric pieces in strips on the living room floor, then pinned them together, rolled them up, and put them on the shelves, in order. However, once I'd sewn the 'bricks' into strips, when I came to sew the strips together it seemed impossible to prevent pieces of the same fabric from appearing next to each other, despite my careful planning on the floor. In the end I pegged the strips out on the washing line as it was faster to move them around. However, I still ended up with unwanted matching patches.

• When I laid the backing fabric, wadding and patchwork layers out on the floor, I laid them backing fabric first, then wadding, then patchwork layer. I pinned them together, then I thought, no, the patchwork has to be wrong side up, so I laid it out and pinned it again. Then I made a mini version out of one fabric brick, and small pieces of wadding and backing fabric and realised that wouldn't work, so laid and pinned it one final time. (And after I'd done that I realised I was right the first time, because seeing the raw edges doesn't matter because they're being covered with binding...)

• I forgot to leave a gap when I machine-stitched around the edge of the quilt layers, so had to unpick it to turn it right side out.


Monday, 9 May 2016

Welcome to my new (motor)home!

Not my permanent residence, but I've spent a fair bit of time in my new moho (short for motorhome) so far! And although the interior decor isn't as lairy as some I've seen, it could still do with some improvement. The easiest way to do this, I felt, was to make a version of the traditional 'home sweet home' cross-stitch sign.

So I created a pattern from an online cross-stitch pattern generator (see the printout below), the embroidery hoop came down off the wall, and off I went.


I did all of the green stitching in one session, for the two 'moho's and the two hearts, fuelled by beer in the pub the moho was parked outside for the night.


Then I chose the contrast colour for the word 'sweet' and the border: a lipstick-red.

Cross-stitch embroidery saying Moho sweet moho

The mistakes I made are visible in this pic - can you see them? Not that it bothers me: absolute perfection in anything handmade is rare!
All it needs now is a little frame and it can hang in the moho.

Friday, 26 October 2012

Block draughts under the door: make a draught excluder

Draught excluder, made by Adrienne Wyper - Made it! blog
'Draught excluder' always sounds to me like some hi-tech cutting-edge device, rather than a fabric sausage.
I've been meaning to make one for ages and now it's getting chilly and those draughts around the windows and door are getting more noticeable.

How to make a draught excluder
Measure the width of the doorway and cut a piece of fabric this wide plus a length to give you enough girth in your sausage. A small side plate is about the right size, so measure its circumference (right around the edge) and there you go. Then draw around the side plate on to the fabric twice, for your two end pieces. Sew one end piece onto the fabric length, and up the side seam. Stuff the draught excluder with a fairly heavyweight stuffing. (I used bits ripped out of an old pillow but it's too light to stay in place at the bottom of the door so will have to be replaced. Learn by my mistakes!). Sew the other circular end piece onto the sausage. You'll probably have to finish the sewing by hand as it's too hard to manoeuvre a stuffed sausage around under your needle plate. Position the excluder at the base of the door and enjoy enhanced cosiness.

More home makes...
More on sewing...

Saturday, 10 December 2011

Make a cushion from two napkins

Warning! If you object to seeing the cushion pad through the gaps between the ribbons, this pattern is not for you!
Take a couple of green* linen** napkins. (Note: ironing the napkins would make for a better photo, but the creases drop out with use.)
Sew together, right sides facing, around three sides. Stuff in cushion pad. Sew on three pairs of red* ribbon lengths along the open side. Tie each pair into a double knot to close cushion.

*colour choices are, of course, up to you
** fabric choices are also, of course, up to you

Sunday, 23 October 2011

Colourful contrast; colourful language


I've tried cross-stitch about twice in the past, not too impressively. So this time, I decided to use more strands of the thread. As my design was words, I googled 'cross stitch pattern generator' - there are loads of results. You type in the text you want, choose your font, print and stitch!
I did a little of mine on the train home, getting some curious glances. One woman definitely thinking, 'no, she's not actually sewing the word "fuck", is she?' To which I would say: in the case of clothes moths, the destructive little monsters, it's entirely appropriate!
I love the contrast between the old-fashioned charm of a homemade lavender bag, decorated with 'colourful' language.
The fabric bag is made from offcuts of a skirt I made in the summer. The lavender is from our allotment, augmented with a couple of pieces of cotton wool dripped with lavender oil. I made this one for a friend's birthday, and another has asked for one too. And my other half fancies one for his half of the wardrobe. Lots more cross-stitch on the commute then...