Showing posts with label accessories. Show all posts

Wednesday, 19 October 2016

How to knit a triangle (that's a neckerchief, or a Hilda-Ogden-homage headscarf)

As a knitter, I'm a bit crap. I like instant gratification and get confused following complicated patterns. (Having said that, I haven't yet followed one that's that complicated.) It's safe to say, I like to keep it simple when it comes to knitting.

So I'm happy to report that I have new creative inspiration for a manageable project for me. It came via the That's Not My Age blog, where Alyson posted on a knitted neckerchief range by knitwear designer Jo Gordon. She's a Scottish designer who produces gorgeous machine-knitted items – including her neckerchief/headscarf.

It's gorgeous and as I looked at it, I thought: 'what a brilliant shape, and a new headgear idea...and a simple shape...a simple shape that I could knit...a simple triangle to wear around the neck or on my head.'

So, five minutes later, I've cast on. Fuchsia-pink fine angora yarn from my stash, so it's label-less, and 7.5mm needles. A quick online check reveals how to knit a triangle from the wide end: cast on stitches to reach your desired width (I wrapped my tape measure around my head and pretended to tie it in front: 70cm - I have a big head). Then k1, k2 tog at each end of every row, to decrease the piece to a triangle shape.

I'm sure I'll wear my scarf around my neck tied at the back, but surely the headscarf is due for a revival, as an alternative to the ubiquitous beanie-with-big-pompom? How about in homage to Hilda Ogden? (I won't be sporting rollers with mine, though.)


Three days later, it's finished. As I predicted, I won't be wearing it headscarf style... Unless it's really cold...

Tuesday, 11 October 2016

Wool Week 2016: knitting for charity

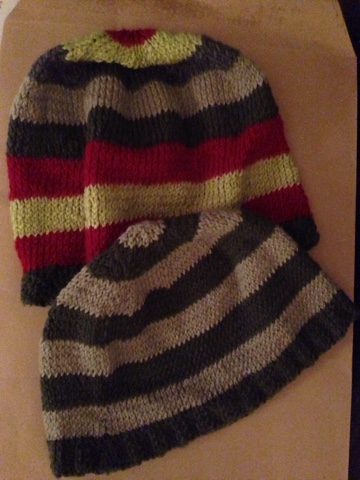
These are the first two hats I ever knitted, and they're now on their way to an unknown recipient.
I made them for my OH and he was kind enough to wear them a couple of times (sizing is a bit of an issue!), but we're having a bit of a clear-out and I agreed – eventually – that he needn't hold on to them.
Obviously, I wanted them to go to a good home, and I knew just where that was, having had previous positive dealings: Knit for Peace UK.
This charity receives knitted items and distributes them to hospitals, refuges, drop-in centres, and to developing countries. They'll also take gifts of unwanted yarn and needles (great way of getting rid of an out-of-control yarn stash).
Knit for Peace also came up with the idea of the Good Gifts Catalogue, where you 'give a goat' (or seeds for crops, bikes for midwives and so on) as a present, and someone who needs it is the actual recipient of the gift.
If you want to knit for charity, there are free patterns available on the Knit for Peace website. At the moment, they're looking for knits for adults, like hats. I like the idea of my two helping to keep someone warm, wherever and whoever they may be.

Friday, 15 July 2016

How to make a flower crown

Strolling across the festival field, I noticed a couple of big daisies and loads of clover.

I'm not averse to a bit of festival chic but it's a bit chilly for short shorts and too dry for wellies, so a flower crown it is.

How to make your flower crown

Using the daisy chain principle works well with clover, although you need to press a bit harder with your thumbnail. 

Never made a daisy chain? Pick some, then press your thumbnail vertically through the stem about halfway along. Repeat with next daisy, and the one after that. Thread the stem of the last daisy through the stem of the first to make a circle. Put on head, or hang up until needed.


Tuesday, 9 April 2013

How to customise shoes: add fabric heels

I think this project – giving a pair of shoes an update with new fabric-covered heels – was inspired by Gok Wan on TV a while ago...

Make a template for the heel shape (which is very different to how you might imagine it, I promise) by sticking on layers of sticky tape.

When you've got a thick layer, draw a line around the edges of the heels.

Now peel off the sticky tape, and cut around the line.

On your fabric, draw around the sticky-tape shape and cut out. Stick it on the heel with fabric glue.


Thursday, 24 November 2011

Five-minute fashion DIY: turn a scarf into a snood

Snoods are having a stint in the fashion spotlight; they’re e-v-e-r-y-w-h-e-r-e. And with good reason. They’re very cosy, they can double up as headgear (just pull a loop of the snood up over the back of your head), and versatile: wear one in a long loop like a giant necklace, or twist round and round your neck for maximum heat retention. And once your snood is on, it stays put, no constantly flipping the ends back over your shoulder. And you can join in with this trend in five minutes flat.

How to turn a scarf into a snood
All you need is an old scarf, hand-knitted, machine-knitted, crocheted or fabric. To transform your scarf into a snood, all you need to do is to join the ends together to form a loop. If your scarf is knitted or crocheted, you’ll ned some yarn in the same colour (or contrasting colour if you prefer). Remove any tassels or fringing first. With a large-eyed needle, stitch the two ends of the scarf together.
If you don’t have an old scarf you want to use, knit your own super-simple snood: cast on enough stitches for your desired scarf width. Knit until scarf is long enough. Knit entirely in garter stitch, or try knitting and purling alternative rows, for stocking stitch. You can also try ‘knit one, purl one’ for a ribbed effect, or ‘knit two, purl two’ for a more defined rib. Stitch the ends together with the same yarn to form a loop.

Did you know? The word ‘snood’ used to refer to a type of hairnet, worn on the back of the head to hold the hair.

This blog first appeared on Allaboutyou.com, where I used to work. It was a great website, with lots of top-quality craft content, managed by me. Unfortunately, it was closed in January 2015.

SaveSaveSaveSave