I've been making jewellery for years, as my dad is a jewellery
designer/maker, but I've seen myself at work and I know I've got plenty
to learn, so I was looking forward to my half-day Introduction to
Jewellery Making course, using beading and wire techniques, at the London Jewellery School. The school's
motto is 'everyone can make jewellery' and, based on my experience, I'd agree with that.
Where's the course held?
Fittingly, the London Jewellery School is just round the corner from
London's Hatton Garden, the street at the centre of London's jewellery
and diamond trade since mediaeval times. If you've never strolled this
street, I'd recommend arriving early for your class and spending a while looking in shop windows, admiring the
trays and trays of diamond rings.
Who's on the course?
We were a mixed bunch of women (maximum class size is eight) and our
tutor Becky started off by asking us to make a sticky label name-badge,
and to introduce ourselves and explain why we're there. Some have never
made any jewellery and some have had a go but want to improve, like me.
(My stated aim was not to have bits falling off my earrings!) A couple
of my fellow students had been given a gift voucher for the class – what
a lovely present! – and there was one mother and daughter learning
together. The atmosphere of intense concentration was punctuated by
bursts of giggles. At the end everyone agreed that the course was a
really enjoyable way to spend three hours.
What did we learn?
At each place was a case containing the different pliers and wire
cutters that we'd need. In the centre of the large table that we all sat
around were lots and lots of boxes of enticing beads. Becky gave clear
instructions, and offered support and encouragement, coming round the
table to dole out individual assistance where needed.
I was amazed at how much we managed to produce in just three hours.
We all went home with three pairs of earrings, two bracelets and a
necklace – those are mine in the photo below, minus the necklace.
Along the way we learned basic skills and how to combine them in different ways to achieve different results.
Progressing at a steady pace, we first learned how to judge the
length of a headpin for a chosen bead, and how to cut it, how to make a
loop, how to open the loop, and how to close it once it's on the
earwire.
Our first project (left, top, gold colour) was a pair of earrings, made
by learning how to cut headpins to size, thread on a bead, form loops
with the round-nosed pliers and slip onto ear wires.
We practised our loop-making skills by using short sections of
headpin, threading with beads and joining with loops for longer,
multiple-bead earrings (left, silvery beads).
Next we used several different-length headpins with groups of beads
(left, red and black) – I found it quite tricky to make three loops for
each earring and squeeze them all on to the earwire.
An elasticated bead bracelet (left, black, white and grey) was next, with Becky offering more
expert advice on how to tuck away the ends of the elastic by threading
it through the beads.
Memory wire was our next tool, which 'remembers' its spiral shape so
it coils around your wrist. Again, we laid out the beads to check the
combination and then threaded them onto a length of memory wire, and
finished with a bead at either end (left, green bead bracelet).
To make the necklace, we used tiger tail beading wire, made of
several wires covered with nylon. After laying out the beads and
attaching one end of the clasp, we threaded the beads on to the tiger
tail. A professional knot, small crimp bead to hold the knot in place
and tidy tucking in of the ends was certainly a better option than the
unreliable knot I'd have tied left to my own devices.
Since the course I've worn all of the jewellery I made - and even had
compliments - and I'm confident that I know how to make more without
risking losing my beads!
Find out more
The Introduction to Jewellery Making
costs £60 and is held on weekend afternoons from 2-5pm on selected dates between
April 29 2017 and November 9 2017. Find details of lots more
jewellery-making courses – including online courses – on the London Jewellery School website
or call 020 3176 0546. The School is at Rear Ground Floor Studio, New House, 67-68 Hatton Garden, London EC1N 8JY.
Thursday, 16 February 2017
Monday, 13 February 2017
Valentines: handmade with love
Hearts are the symbols of Valentine's Day. One shape, so many possibilities...
Here's an example of instructions that I wrote for Hearst Magazines' Allaboutyou.com: a spotted heart card with gingham ribbon bow.
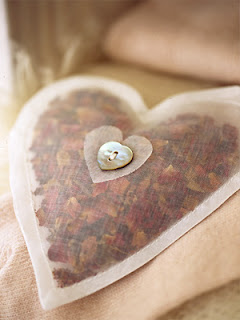
And here's a variation on the fabric heart: sheer fabric machined together without being turned inside out, and filled with rose petals, and trimmed with a tiny heart and mother-of-pearl button.
Sometimes, keeping it simple has more impact. It's really easy to make your own Valentine card.
All you need to do is cut out a heart shape (template below) from whatever you want – fabric, wrapping paper, coloured card, corrugated cardboard, a picture in a magazine, an online print-out, your own photo/s – stick it to a blank card (decorating with a button, ribbon, petals, sequins).
Or stick on several smaller hearts of the same size, or layer smaller and smaller hearts on top of one another...
A good way to come up with your finished design is to cut some hearts from scrap paper and play around with layouts and sizes until you're satisfied. Then cut out the heart shapes you'll use on your card.
Add a heartfelt, handwritten message... what could be more meaningful for the one you love? (My own Valentine this year features a picture cut from a magazine, plus a paper heart; no previews here though.)
You can also cut heart shapes and string them horizontally, like these map hearts, or vertically.
And if you want to give a present too, how about a fabric heart? Filled with lavender, they can be moth-repellers, drawer scenters, keyrings, hanging decorations, and you can, of course, attach them to a card. Cut two hearts from fabric. Stitch them right sides together, leaving a gap for filling, and enclosing the ends of a ribbon (or string, or yarn) loop, then turn inside out. Fill with lavender, rose petals, cotton wool, cut-up old tights or soft toy filling, and stitch the opening closed. See the heart template below; enlarge to your chosen size.
Here's an example of instructions that I wrote for Hearst Magazines' Allaboutyou.com: a spotted heart card with gingham ribbon bow.

And here's a variation on the fabric heart: sheer fabric machined together without being turned inside out, and filled with rose petals, and trimmed with a tiny heart and mother-of-pearl button.
Thursday, 9 February 2017
Keep the pot hot: free knitting patterns for tea cosies
Whether they keep the teapot hot or not (opinions vary), a hand-knitted tea cosy is perfect for lending an authentically vintage vibe to any tea table. Here are some of the best tea cosy knitting patterns, all from the UK, and all free.
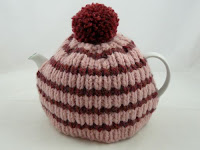
Super Chunky Tea Cosy, from Nixneedles
Solidly stripy, in muted shades – and with a pompom!
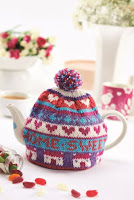
Home Sweet Home, by Zoë Halstead, from Let's Knit
A Fair Isle design featuring hearts, houses and 'Home sweet home'
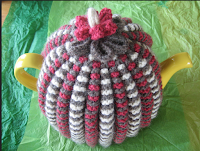
Grannie's Traditional Tea Cosy, from Tea by the Sea
Keren Smith created this pattern based on a vintage tea cosy that her gran knitted, working out how to create the double layer.
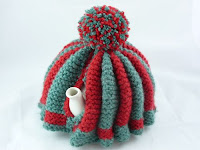
Traditional striped tea cosy, from Nixneedles
This pattern is for an 8-10-cup teapot, worked in chunky wool.
Stretchy zigzag tea cosy by Ruth Cross, from Let's Knit magazine
You'll need to register to download this PDF pattern (which doesn't mention the sewn-on sequins this one's been decorated with – obviously you can embellish any tea cosy, or other knitted item, in whatever way you choose).
Here's another Made it! blog post on where to find free knitting patterns
Thursday, 2 February 2017
How to make preserved lemons
Preserved lemons are a staple in north African and southeast Asian cooking. You can buy them (Belazu Preserved Lemons, £2.13, from Waitrose, for example) but I've been making my own for a couple of years. It's simple and quick – apart from the weeks of waiting for them to be ready.
Preserved lemons recipe
A delicious way to add a citrus tang to tagines, vegetables, roast potatoes, couscous and pulses, these gorgeous full-of-flavour jarfuls make great gifts, too.
A delicious way to add a citrus tang to tagines, vegetables, roast potatoes, couscous and pulses, these gorgeous full-of-flavour jarfuls make great gifts, too.
• 6 unwaxed lemons
• 150g salt
• 3 bay leaves
• 2tbsp black peppercorns
• 3 cinnamon sticks
• 500ml Kilner-type jar, sterilised
Top and tail three of the lemons. Cut into quarters lengthways without cutting right through the base.
Pour half the salt into a sterilised jar, and add the bay leaves, peppercorns and cinnamon sticks.
Spoon the remaining salt into the centre of each lemon, holding it over the jar to catch salt fallout. Place them into the jar – this might be a bit of a squeeze.
Add the juice of the remaining three lemons to the jar, and top up with water, if necessary, to cover the top of the uppermost lemon piece.
You can tuck in more bay leaves and cinnamon sticks if you like, which look pretty pressed against the sides of the jar.
Leave in a dark place, tipping the jar around occasionally to mix everything together, for about six weeks.
To use, remove a quarter, half or whole lemon, rinse, remove any pips and chop finely before adding to couscous, pasta, roasted vegetables... basically, wherever you might use lemon zest and juice, try preserved lemon instead for a saltier, tangier lemon flavouring.
Subscribe to:
Comments (Atom)


