Monday 23 January 2017

Patchwork – and patience - the quilt is finished!

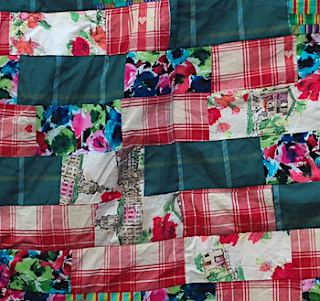
Finished brick-pattern patchwork quilt, by Adrienne Wyper, on her Made it! blog http://made-it-made-it.blogspot.co.uk
Precision and patience are both necessary for patchworking. Precision for the accurate measuring and cutting required to make your fabric pieces, and patience because it takes forever! That's why patchwork is intrinsically unsuitable for me: I enjoy a creative challenge, but I'm also fond of instant gratification.

At the weekend I finally finished my first – and possibly only – patchwork quilt. It took five hours to sew the patchwork, backing fabric and wadding together, and to make and attach the binding.

The project began about six months ago when I borrowed The Quilting Book (DK, £25) from my local library to see if there was a patchwork pattern simple – and swift – enough for me to follow. The book was due back before I'd started so I took a pic of the brick quilt pattern (which looks like brickwork except all the 'bricks' aren't the same size). It's designed to work with a fabric jelly roll (pre-cut fabric pieces rolled up together) but I didn't have one of those; I had an assortment of fabric leftovers and old clothes.
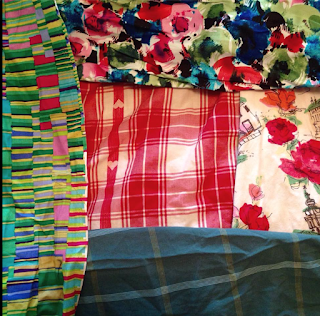
Fabrics for patchwork quilt, by Adrienne Wyper, on her Made it! blog http://made-it-made-it.blogspot.co.ukClockwise, from the top: leftover fabric from sewing a Colette Sorbetto top, an old skirt of mine, an old shirt of OH's, leftover fabric from sewing a Prima pattern top, and, in the middle, an old dressing-gown given to me ages ago by my step-grandma.

The wadding came from Hometown, Rochester, along with advice on why it didn't matter in the slightest if the quilt wasn't perfect, and the backing fabric was from Croft Mill.


Cutting out patchwork pieces, by Adrienne Wyper, on her Made it! blog http://made-it-made-it.blogspot.co.ukSo first I had to unpick all the seams, remove pockets, bias binding, hems, collars, cuffs...
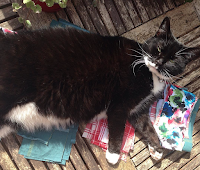
Cat lying on patchwork pieces, by Adrienne Wyper, on her Made it! blog http://made-it-made-it.blogspot.co.ukNext I started cutting the fabric into strips. The sun was out, so I did a bit in the garden, at which point my cat decided to 'help' by lying on the piles of pieces. (She enjoys lying on the finished quilt too.)

When I came to sew the backing fabric, wadding and patchwork layers together, I first laid them out (on the living room floor, again). I pinned them together (taking blogger Flossie Teacakes's advice to pin from the centre, in concentric circles).

I machine-stitched around the edge, then came the quilting. Taking my friend Kirsten's advice, I started at the centre point. She's very meticulous and methodical: perfect atrributes for a patchworker and quilter. (I commissioned her to write this beginner's guide to patchwork and quilting). I stitched 'in the ditch' (along the existing seam lines) lengthays and widthways at the centre, then halfway between the centre lines and the edges to give 16 quilted squares.

Finally, I made some binding for the edges, by cutting six metres of 12cm-wide backing fabric, then ironing in half, then folding each side into the centre. It doesn't need to be bias binding because it's for a straight edge, thankfully. I've made bias binding and it takes even longer!


What went wrong 
Given that it was my first quilt, and that, as stated above, patchwork and quilting are unsuitable crafts for me, I wasn't expecting it to turn out perfectly. And it didn't!
Close-up of brick-pattern patchwork quilt, by Adrienne Wyper, on her Made it! blog http://made-it-made-it.blogspot.co.uk

• One of the hardest things was placing each fabric piece so that it didn't touch another of the same pattern. I planned the layout by laying the fabric pieces in strips on the living room floor, then pinned them together, rolled them up, and put them on the shelves, in order. However, once I'd sewn the 'bricks' into strips, when I came to sew the strips together it seemed impossible to prevent pieces of the same fabric from appearing next to each other, despite my careful planning on the floor. In the end I pegged the strips out on the washing line as it was faster to move them around. However, I still ended up with unwanted matching patches.

• When I laid the backing fabric, wadding and patchwork layers out on the floor, I laid them backing fabric first, then wadding, then patchwork layer. I pinned them together, then I thought, no, the patchwork has to be wrong side up, so I laid it out and pinned it again. Then I made a mini version out of one fabric brick, and small pieces of wadding and backing fabric and realised that wouldn't work, so laid and pinned it one final time. (And after I'd done that I realised I was right the first time, because seeing the raw edges doesn't matter because they're being covered with binding...)

• I forgot to leave a gap when I machine-stitched around the edge of the quilt layers, so had to unpick it to turn it right side out.




Tuesday 17 January 2017

Trying out the T-shirt yarn

There are several balls of homemade T-shirt yarn in the wicker picnic basket that most of my stash is stored in. I made some a couple of months ago, cutting up an old T-shirt of my partner's and one of mine. One is heavier weight, the other silkier, both are black.

I have knitted with the T-shirt yarn I made with the intention of turning it into a bag, but pulled it all out because there wasn't quite enough of it.

I wrote about how to make T-shirt yarn in my '5 ways to knit without wool' for Prima, which also included carrier-bag yarn, or 'plarn', and string.

You can follow the slightly complex cutting pattern explained in that feature, or you can simply cut your way up the body of a T-shirt in a spiral.

Once you've cut your T-shirt into a thin strip, pull and stretch it in lengths, to encourage the sides of the strip to curl inwards. Wind into a ball.

We're having some building work done on the house soon (yes, more room, more room for crafting) so I've been having a bit of a clear-out. Two pairs of jersey pyjama trousers were destined to be dumped. One pair I turned into T-shirt yarn, by cutting in a spiral up one leg and down the other.

For the other pair I was inspired by a necklace by Etté Studios, so I cut the leg into loops. I stretched and pulled these, then bundled 10 or so together, and bound them round and round at the back with another length of T-shirt yarn.

While fiddling with the loops I realised they have uses in their own right: doubled up, a sports headband to keep hair in place and stop it from flopping into your face when you're running or moving around. Worth doing for this alone! Doubled up, wear a couple as a choker. Use one doubled, trebled or even quadrupled up on itself as a lovely soft hairband for a ponytail or bun. Or double or treble up for a bracelet/sweatband. They do lose elasticity, but you'll have plenty more.

If you can't be bothered to make your own T-shirt yarn (or you don't have any T-shirts you're prepared to cut up), there's lots available to buy, including Jersey be Good, from Wool and the GangZpagetti, from Hoooked or lots of options from the T-shirt Yarn Shop.

One thing I didn't include in my alternative yarns feature was knitting with strawberry lace sweets, not something I've tried personally, but lots of others have. The earliest mention I could find is on the Craftster forums in 2008 by Bexsus of Lewes, and this is her pic of the result!


Sunday 8 January 2017

Brighten up January with flowering bulbs and funky plants

After taking down the Christmas decorations and the tree (which I cut up to burn on the stove –pine burns really well, with a satisfying crackling as the flames hit the sap), the house looks bare and boring.

It's time for a New Year re-run of bringing in the greenery, that fine old pagan custom we all participated in before Christmas. At this time of year, we can be forgiven for getting ahead of ourselves, season-wise, by bringing in spring-flowering bulbs – not least because almost everything in the garden is frost-chewed and blackened.

If you don't have your own bowl or pot of bulbs that you've been preparing for weeks, then supermarkets are a good source. My pot of Paperwhite narcissi and white hyacinths are from Tesco, £1.50 and £2.50 respectively. They were in pale-pink paper pots, a colour I hate, so I've wrapped them in newspaper (thought that was appropriate for the Paperwhites), but you could use leftover wrapping paper, brown paper, tissue paper... Just cut strips, wrap around the pot and secure with sticky tape. It doesn't have to be perfect; it's not permanent.

The pointy green shoots pushing up from the soil are an annual reminder of the renewal of life, the flowers are bright and cheerful, and the scent!

This isn't just something to do at home. Buy a pot of bulbs for your desk, or try a succulent. These tough little plants are brilliant for a dry, unhealthy office environment. The idea of greening the indoors after Christmas is one that Dobbies garden centres subscribe to, and the company has a great range of interesting – not too large – plants in interesting pots.

I have their cactus in a star-design pot (£3.99), which has withstood freezing temperatures in my bay window for the past couple of months, but there are all kinds of angular containers, including a mini-greenhouse frame, and terrariums.

Scott Provan, Dobbies houseplant buyer, has a tip for displaying your plants: 'When arranging plants for display, trios work best, with a mixture of heights. Use your tallest plant at the back and softer textures at the front. Try mixing up cacti and succulents.'

Thursday 5 January 2017

Freezing fun: making ice balls, lanterns and tealight holders

The morning after...
Mortals make plans and the gods laugh... Well, that was disappointing! The water in the tins didn't freeze at all, and the rest of it froze patchily, so I've ended up with a ball that looks like a dog's got hold of it, and a rather nice ice wreath...


My previous attempts were more successful. Here's one I made earlier...


Yesterday
Full of cold, I decided to beat the bareness left behind when you take down the Christmas decorations on Twelfth Night (is that January 5th or 6th? Find out here) and decorate the garden overnight just with water.

I filled a random selection of containers grabbed from around the house as the sun started to go down.

Tomorrow morning, see how they all turned out!

Clockwise from top left: a hand cream tin. I'll leave the ice in and pop a tealight on top. A plastic bag inside an empty tin can. Once the water's frozen, I'll pull the bag out, pull it away from the ice and add a tealight. Hopefully there will be ice up the sides and a space in the middle, to make an ice lantern. With the two plastic takeaway containers, I'll twist them to free the ice, then add tealights. And with the yellow and red plastic half-balls, they're filled with water as is the container they're in. When it's all frozen, I'll remove the ball halves, and stick the two ice hemispheres together with water to make an ice ball, and plop some tealights into the dents they leave behind.